How To: Using Command Center
- Where to find Command Center
- Identify the differences between Command Center and VMS and what the use case(s) for each are that make them different
- Demonstrate all the functionality of Command Center that a user needs to know:
- Identifying events and their initial level of urgency and details about the events and the event dashboard
- Navigating to the livestream from an event
- Speaker talk down usage
- Logging notes and other detail info for events (such as tags and contact info)
- Requesting video
- Resolving an event
- Sharing - When you want to share an event with someone you can hit this button to generate a link that you can send. Now, keep in mind that only people with a Command Center login will be able to get in to view this alert
- Call Recording
- Simultaneous Camera View - In Command Center you can see all three cameras at the same time.
- Live Stream - If you need to quickly access the live stream of the cameras, click the live stream button above the camera view clips.
- Live Stream Functionality - From Command Center you can also take a snapshot, turn on lighting options, zoom in or out and move around, navigate to presets, and much more. A few key differences between Command Center and VMS though are:
- Seeing all camera views simultaneously
- Directly talk down from the trailer from within your browser if you hit the CALL LOCATION button when in the live stream.
- You can also hear responses if you have your speakers on your device on.
- See a birds eye view of the area in which the trailer sits.
- See a list of contact information that is useful for anyone monitoring the system and needs to involve other people in an event.
- Upload procedure descriptions to help those monitoring the system understand what protocol is depending on the event.
- See a reference of what the existing automated deterrent and reporting schedules are
- We’ll also provide the phone number of the unit to those who do not have speakers or mics on their device and cannot utilize the in browser talk down functionality
- Here is where those things are located:
- Requesting Video - Hit Request Video to request the download of a video clip. This can be found here.
- This will give you a notification that the request was successfully sent to Liveview for processing.
- You will then receive an email titled “Video Download Ready - Event Video” which will allow you to download the video to your device:
HOW TO USE THE COMMAND CENTER
The LVT Command Center is a cloud-based SaaS (software as a service) application that provides a queue-based system for managing security alerts from Edge devices. This software was designed with security operators in mind and provides one-click access to event data. This enables users to make real-time decisions in response to remote security threats. The LVT Command Center has many capabilities and allows users to easily live stream from their LVT camera units, access an archive of documented security events, activate the deterrent capabilities of units in real-time, share footage securely, see thermal signatures, set up notification alerts, view surveillance analytics, and more.
Objectives
In this guide, you will learn:
Command Center
Logging In
To access Command Center, first log in to the VMS portal at login.liveviewtech.com.
From the VMS home page, click on the Command Center icon on the left side of the screen.

During the implementation process, LVT will create one administrator account for each client. That administrator is then responsible for creating all other user accounts from the Admin tab in the Command Center menu.
Permissions
Permissions for Command Center may vary from those of the VMS and can be set up differently from a user's VMS permissions. If a client opts for using Command Center, then their users will see the Command Center selection in the menu and can access it. If not, that option will not show in their menu.
Command Center Events Dashboard
The dashboard in Command Center looks very different from the one in the VMS. Because it is designed for real time monitoring of live events, all triggering events are added to an event list in the dashboard view like this:


1. Event Filters - manipulating these filters will allow a user to see their queue customized by location, number of events, or by priority and time as seen in the dropdown here: 
2. Event Data Bar - Quickly see the number of events in your queue and the oldest.
3. Event Preview Clips - These are the still images that show the snapshot of the first moment that an alert was triggered. 
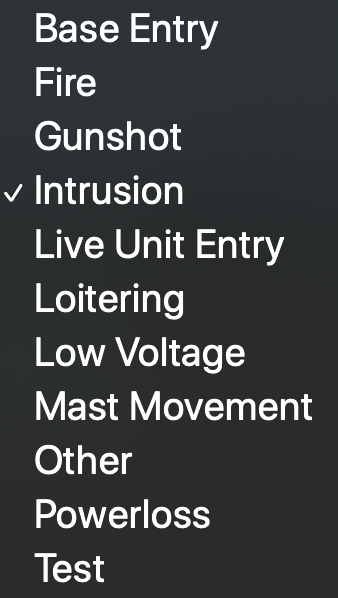
4. Event Types - There are different types of alert types. Here is a list of current types of alerts:
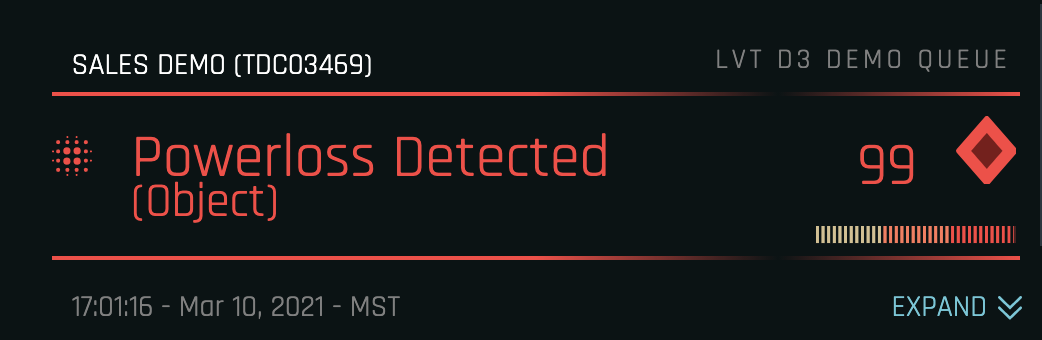
6. Urgency Rating - Clients can have a ‘sliding scale’ of urgency for events ranging from 0-100 (100 being the most severe and 0 being the least). Urgency is typically set up at the event type level. For example:
You are most concerned with intrusions, so if an intrusion alert is triggered you want that to come as a 100 level severity. You’re not as concerned with a cat crossing through your frame of view, so you make the "Other" category of intrusion alert a 5 on the severity level. If you’re watching your dashboard and an intrusion alert comes in it will come in at the top of the queue with a score of 100 like this:

A decrement number in your settings can deprioritze certain event types in the queue. If a certain event type enters the queue and then the same event type enters the queue again, the first alert will decrease in severity by a set number. For example, you want intrusion alerts to be set at 100 severity, but if a new one comes in right after the previous one, you want the previous one to have a severity of 99 and the new alert to be at 100. In this case, your decrement number would be set at 1 for intrusion alerts.
It will look like this:

7. Expand View - Expanding the view is how you see the details and actionable buttons for each alert. Click the ‘Expand’ button to see the expanded view which looks like this:

9. Share | Call Recording Indicator 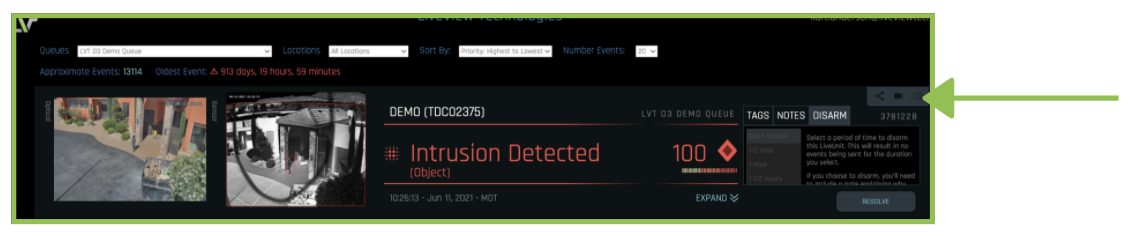
10. Resolve - Resolving an alert will dismiss it from the queue and can be viewed in reports. There, you can see how many events were resolved, who resolved the event, and when it was resolved.
11. D3 Command Center Menu - This is the hamburger menu.

Expanded View and Functionality


Summary
In this guide, you learned:
- where to find Command Center
- You can identify the differences between Command Center and VMS and what the use case(s) for each are that make them different
- You can demonstrate all the functionality of Command Center that a regular user would be required to know:
- Identifying events and their initial level of urgency and details about the events and the event dashboard
- Navigating to the livestream from an event
- Speaker talk down usage
- Logging notes and other detail info for events (such as tags and contact info)
- Requesting video
- Resolving and event